In today’s market, custom patches offer a powerful way to express identity, brand, and creativity on fabric, turning ordinary garments into conversation starters. They work on jackets, bags, hats, and more, delivering a tactile, premium branding touch that lasts through wear and washing. This guide explores how to turn ideas into tangible patches, including practical tips for DIY patch creation, from concept sketching to finishing touches. We’ll cover materials, backing options, color decisions, and sizing to help you plan patches that look crisp at small scales. By the end, you’ll see how a simple idea can grow into durable, eye-catching patches that customers, teammates, or fans will cherish.
Beyond traditional patches, designers turn to embroidered emblems, fabric badges, and sewn-on insignias to carry a brand story. These elements are versatile across apparel and accessories, acting as compact marks that reinforce identity without overwhelming the overall look. By using related terms such as embroidered emblems and fabric badges, the discussion follows LSI principles to connect design, manufacturing options, and customization. Together, this approach helps readers explore the full spectrum of options from concept to production.
Custom Patches: Elevating Brand Identity and Community
Custom patches offer a tactile, premium way to express identity for brands, teams, clubs, and event organizers. By choosing distinct shapes, colors, and embroidery motifs, you can turn merchandise and uniforms into recognizable symbols that fans and members wear with pride. This approach aligns closely with the idea of custom embroidery patches, helping reinforce brand voice across apparel and accessories without relying on generic graphics.
When planning a patch program, think about how the patches will travel from concept to consumer. Consider audience, distribution channels, and licensing rights to ensure the patches remain consistent with your overall branding. If you’re exploring how to make patches, start with simple, recognizable silhouettes and expand to multi-color designs as your line scales.
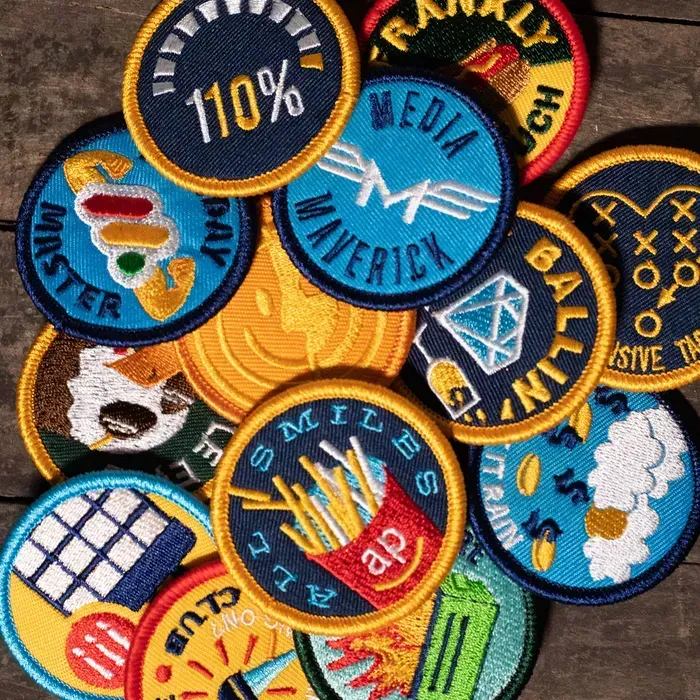
Patch Design Ideas: From Concepts to Compelling Visuals
Great patch design ideas begin with a clear concept and a strong focal point. Whether you’re aiming for a mascot, an emblem, or a narrative scene, the best designs read well at small scales and translate cleanly to embroidery. Your patch design ideas should balance shape, color, and typography to maintain legibility on diverse fabrics.
Explore categories that tend to resonate across audiences: team emblems, event milestones, brand logos, abstract geometric shapes, and story-driven single-panel designs. By testing variations in shape and color palettes, you can ensure that your patch remains highly visible from a distance while preserving intricate details when viewed up close.
Materials and Anatomy: Crafting Patches for Longevity
The material choice and patch anatomy define how a patch feels and lasts. Common fabrics like twill and felt, along with cotton or polyester blends, offer different textures and durability. Selecting the right embroidery threads and color palette is essential for consistent branding, especially when producing multiple batches of custom embroidery patches.
Backings play a crucial role in practicality and wear. Iron-on, sew-on, and Velcro-backed options each suit different use cases, from consumer apparel to uniforms and removable patches. Attention to size, border style, stitch count, and edge finishing (such as merrow borders or satin stitching) ensures durability and a polished look for every patch.
The Patch Manufacturing Process: From Digitizing to Finishing
Understanding the patch manufacturing process helps you plan timelines, costs, and quality. The journey starts with design proofing, then digitizing—converting artwork into embroidery-friendly stitch files—followed by actual stitching on fabric and layout calibration. This early work sets the stage for accurate color and scale in the final patch.
Next come backing application, edge finishing, trimming, and quality control. Providers may perform color proofs, knot checks, and adhesion testing before packaging and shipping. By communicating clearly about the patch manufacturing process with suppliers, you can align expectations and secure reliable lead times for both small runs and large orders.
DIY Patch Creation: Hands-On Methods for Prototyping
DIY patch creation is an accessible way to prototype ideas, test colorways, and iterate quickly before committing to a full production run. Start with a sturdy base fabric such as felt or twill and transfer or embroider your design by hand or with a home embroidery machine. This approach lets you explore how custom patches look and feel in real-life wear.
For a homemade finish, experiment with edge stitching, heat-press methods, or fabric inks to achieve a printed or hybrid look. While DIY patch creation can be slower and less consistent for large quantities, it’s ideal for prototypes, limited editions, or personalized gifts where you want a tangible, crafted aesthetic that reflects your patch design ideas.
Working with Suppliers and ROI: From MOQs to Quality and Timelines
When quantities grow, partnering with a patch manufacturer often delivers consistency, faster turnarounds, and scalable options. Evaluate MOQs, pricing, material compatibility, and backing choices to ensure your patches align with your product line. Clear communication about the patch manufacturing process and expected quality helps you avoid surprises on large orders.
For best results, request samples, color proofs, and a transparent timeline. Consider total cost of ownership, including packaging, shipping, and potential licensing or branding rights. A well-planned patch program using the right supplier can maximize ROI—especially when you consolidate production for multiple SKUs under the umbrella of custom patches or custom embroidery patches.
Frequently Asked Questions
What are custom patches and how do they benefit my brand?
Custom patches are small embroidered fabric pieces that can be sewn or ironed onto clothing and accessories. They offer a tactile, premium feel and durable branding, making them ideal for merchandise, clubs, teams, and events. Using custom embroidery patches helps tell your story in a compact, long-lasting format and can elevate product lines with a professional touch.
What patch design ideas should guide my branding when creating custom patches?
Begin with your brand story and audience, then translate it into bold, legible patches. Explore patch design ideas such as mascots or emblems, event patches, brand logos in a compact form, abstract or geometric shapes, narrative panels, and seasonal or limited editions. Focus on a strong silhouette, a restrained color palette, and readable typography to perform well at small sizes.
What is the patch manufacturing process from concept to finished patch?
The patch manufacturing process typically follows these steps: 1) design and proof to confirm scale and readability, 2) digitizing to create embroidery machine instructions, 3) stitching the patch with color and texture, 4) applying backing and edge finishing (merrow border, satin stitch), 5) quality control for color accuracy and durability, and 6) packaging and shipping. Understanding this process helps you set realistic lead times and costs when ordering custom patches.
What is involved in DIY patch creation at home, and is it suitable for prototypes or small runs?
DIY patch creation involves selecting a base fabric, designing your patch, choosing a backing, and stitching or printing the design. For beginners, start with simple concepts and finish with a polished edge. If you’re learning how to make patches, consider hand embroidery or affordable home machines for prototypes or limited editions, then assess durability with testing before larger runs.
When should I choose a patch manufacturer versus DIY patch creation?
For large quantities or professional-grade results, a patch manufacturer offers consistent color matching, efficient production, and scalable options. Consider MOQs, lead times, material and backing options, and quality guarantees. If you only need a few units, prototypes, or highly customized pieces, DIY patch creation can be a cost-effective path while you validate concepts.
How can I estimate the cost and ROI of custom patches, and what factors influence pricing?
Cost varies with patch size, stitch count, color complexity, fabric, backing, border type, and order quantity. Larger runs reduce the per-unit cost and improve ROI, while more colors and dense embroidery increase price. Plan for packaging, shipping, and potential licensing. Prioritize strong patch design ideas to maximize impact at small sizes and maintain cost efficiency.
| Topic | Key Points |
|---|---|
| What are Custom Patches and Why They Matter | Custom patches are small embroidered fabric pieces that can be sewn or ironed onto clothing and accessories. They are versatile for branding, clubs, teams, events, and storytelling; provide a tactile premium feel and can elevate a product line and community. |
| Patch Design Ideas | Design ideas include mascots/emblems, event patches, brand patches, abstract/geometric patches, narrative patches, and seasonal/limited editions. Tips: keep bold silhouettes, legible text, and a cohesive color palette; consider shape, color, typography, and readability. |
| Patch Anatomy | Materials: twill, felt; cotton/poly blends; embroidery threads in many colors. Backings: iron-on, sew-on, Velcro. Size/shape; border style (merrow/satin); density/stitch count. Ensure production-ready vector art and clean digitizing for crisp results. |
| Manufacturing Process | Design and proof; digitizing; stitching; backing and finishing; quality control; packaging and shipping. Understanding the process helps manage lead times and costs. |
| DIY Patch Creation | Base fabric options (felt, twill, sturdy cotton); create a design; prepare a temporary backing; stitch by hand or with a home embroidery machine; finishing options include heat-transfer or fabric inks with a sealant; edge finishing to prevent fraying. DIY is rewarding but time-consuming for larger runs. |
| Working with Suppliers | For large quantities, manufacturers offer consistency and scalability. Evaluate MOQs, lead times, material/backing options, and quality guarantees. Request samples to evaluate embroidery quality, backing adhesion, and color fidelity before committing to a larger run. |
| Cost and ROI | Costs depend on patch size, stitch count, color complexity, fabric, backing, border, and quantity. Larger patches and more colors raise costs, but bulk orders reduce unit costs. Factor in packaging, shipping, and licensing. Design decisions should simplify color palettes and ensure legibility to maximize ROI. |
| Maintenance and Longevity | Iron-on patches require careful heat management; wash garments inside out. Velcro patches need clean, lint-free surfaces. Regularly inspect for loose threads and secure them with a quick stitch if needed. |
| Inspiration and Ideas | Practical concepts include sports team patches, festival-branded patches, club/alumni patches, product-line patches for seasonal items, and commemorative patches for milestones. Tailor colors, shapes, and typography to reflect brand voice and audience preferences. |
Summary
Conclusion: Turning an Idea into a Worn Story
Custom patches have the power to turn a concept into a tangible, wearable story. By combining thoughtful design, material selection, and smart production choices, you can create patches that resonate with wearers and stand the test of time. Whether you opt for the professional polish of a patch manufacturer or the hands-on satisfaction of DIY patch creation, the right approach will help you build a patch program that fans, customers, and teammates will proudly wear. As you embark on your patch journey, remember to keep your focus keyword, “custom patches,” at the center of your decisions, and let your patch design ideas lead to a compelling, market-ready product.