Transfer methods for embroidered design motifs sit at the crossroads of craft and technique, shaping not only how a motif appears on fabric but how reliably it stays in place through hours of stitching, multiple repositionings, and the rigors of washing and wear, ultimately affecting edge definition, tension stability, and the project’s professional impression. Whether you’re a professional embroiderer or a hobbyist, the method you choose to transfer a motif onto fabric profoundly affects accuracy, stitch quality, thread alignment, fabric distortion risk, and the long-term durability of the design, influencing decisions from hooping tension to post-embroidery finishing routines. In this pro’s guide, we’ll explore the most reliable transfer methods for embroidered design motifs, discuss when to use each method, and share practical steps to minimize errors, select suitable stabilizers, and optimize workflow for different fabrics and project goals. By understanding the landscape of embroidery design transfers—often described as embroidery motif transfer techniques—you’ll be able to select the right approach for any project and fabric type. From heat transfer embroidery designs to transfer paper for embroidery, iron-on embroidery transfers, and stabilizers for embroidery transfers, each option offers distinct advantages and trade-offs depending on fabric composition, motif complexity, care requirements, and whether you want a subtle internal guideline or a bold, machine-stitched contour.
Viewed through an alternative lens, this stage can be described as motif placement options, pattern projection methods, or design transfer workflows that seed stitch planning before a single stitch is made. From an LSI perspective, semantically related ideas such as fabric placement accuracy, pre-stitch guidelines, stabilizing layers, tear-away or cut-away backing, and non-heat tracing options help connect the dots between methods without getting bogged down in terminology. By using this broader vocabulary, readers can align the right approach to their material, motif complexity, and care instructions, while keeping the focus on precise alignment, durable finishes, and efficient workflows.
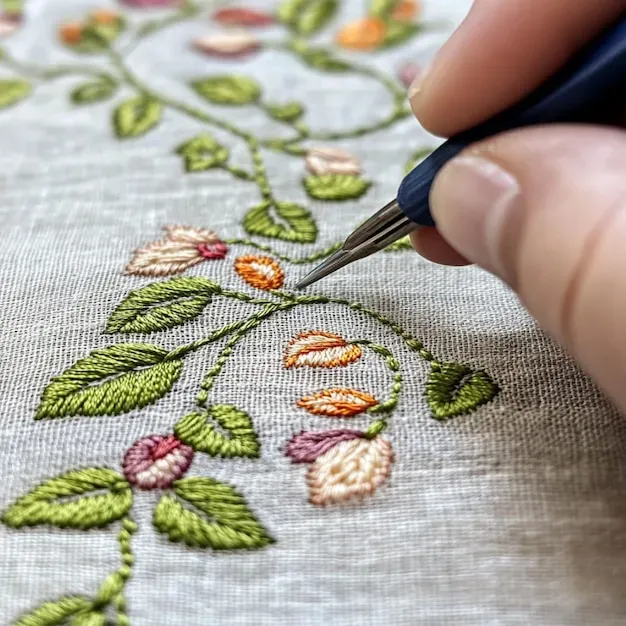
Transfer methods for embroidered design motifs: Choosing the right approach for accuracy
At the heart of any embroidery project lies the desire for precision: to place a motif exactly where you want it, keep it stable through stitching, and decide whether the mark should wash away or stay as a permanent guide. This balance between control and practicality frames every choice you make about transfer methods for embroidered design motifs. By naming and understanding the landscape of options—from paper-based guides to heat-activated systems—you can tailor your approach to the fabric, the motif, and the intended care of the finished piece.
In practice, the range of embroidery motif transfer techniques is wide, and the best method often depends on fabric type, stitch density, and the project’s end use. Thinking through these factors helps you anticipate puckering, shifting, or distortion before the first stitch is made. When you understand the trade-offs—speed, accuracy, washability, and finish—you gain a practical roadmap for selecting a method that aligns with your workflow and your material.
Heat transfer: A quick path to bold, machine-friendly results
Heat transfer opens a fast path to place bold designs on fabrics with machine-friendly results. In this approach, a motif is printed or traced onto a transfer medium and then activated with heat. The medium can be a designed sheet, a heat-adhesive film, or a dedicated transfer paper designed for embroidery projects. When heat is applied, the image adheres to the fabric, providing a guide for stitching or, in some products, a permanent print.
This method shines on stable fabrics such as cotton, linen, or denim, where the transfer remains faithful under multiple passes of the needle. The advantages include speed, repeatability, and the ability to lay out multiple motifs with high precision. Trade-offs to watch for include the risk of a perceived third dimension if the transfer sits on top of the fabric and the necessity to choose a product compatible with both your fabric and embroidery setup. To optimize results, pair heat transfer with the right stabilizers and test on scrap fabric before committing to the final piece.
Iron-on embroidery transfers: Accessible and beginner-friendly
Iron-on embroidery transfers offer a user-friendly, accessible route for moving motifs onto fabric. These transfers often arrive as sheets or pre-printed designs that can be peeled and placed, then fixed with heat from an iron or a hot press. The simplicity makes them appealing for beginners or for projects where tracing complex motifs by hand would be challenging.
While ideal for lightweight fabrics and cotton blends, iron-on transfers require careful heat management to prevent scorching or distortion on delicate textiles. Many systems include stabilizers or backing sheets to minimize fabric stretch during application, helping preserve alignment for stitching. When used thoughtfully, iron-on transfers can serve as a reliable first step in the embroidery workflow, especially when paired with a stabilizer-based approach to lock in position before sewing.
Graphite tracing and transfer paper: Low-tech precision for careful crafters
Graphite tracing offers a traditional, low-technology route to transfer motifs with a hands-on feel. By tracing a design onto transfer paper or graphite-enabled paper laid against the fabric, you create visible guidelines that you can follow with a machine or by hand. This approach emphasizes direct control and can be very economical for casual projects.
To keep lines clean and minimize fabric distortion, many embroiderers pair graphite tracing with stabilizers—such as tear-away or cut-away—to support the fabric during stitching. The graphite lines can be faint, so you may reinforce them with a fine chalk line or a light pen before you start. This method shines when you want a precise, hand-guided layout without relying on heat-based transfer systems.
Stabilizers for embroidery transfers: The foundation of accuracy and durability
Stabilizers form the invisible backbone of reliable embroidery transfers. They come in tear-away, cut-away, and wash-away varieties, and they’re used beneath the fabric or with the transfer itself to hold the motif steady while you stitch. The right stabilizer reduces shifting, puckering, and distortion, particularly under dense stitching or-heavy fabrics.
Water-soluble stabilizers are especially useful when you want to remove all remnants after finishing, leaving no residue on the fabric. A stabilizer-based transfer approach can also help you achieve crisp edge definition for detailed motifs. When selecting a stabilizer, consider fabric type, stitch density, and whether the project will be machine- or hand-embroidered, so you can balance support with finish.
Choosing the right method for your project: A practical decision framework
Selecting the right transfer method blends fabric science with creative intention. Consider fabric type, motif complexity, and washability to guide your choice. Delicate silks or knits may benefit from graphite tracing or gentle heat transfer with a temperature-controlled iron, while denim or canvas often responds well to heat transfer with a robust stabilizer to anchor the design.
End-use and care should drive your decision: if the item will be washed frequently, favor methods that deliver durable edge definition and minimal surface texture. For a subtle appearance, graphite transfer with a light embroidery outline can work, whereas a bold, machine-led finish may come from heat transfer combined with stabilizers. Thinking through end-use helps you harmonize embroidery motif transfer techniques with your workflow, fabric, and design goals.
Frequently Asked Questions
What are embroidery motif transfer techniques and how do I choose among them for delicate fabrics?
Embroidery motif transfer techniques encompass heat transfer, iron-on, graphite tracing, and stabilizer-based methods. For delicate fabrics, start with low-heat or non-heat approaches like graphite transfer with tear-away stabilizers, and use a light stabilizer to prevent puckering. Always test on a scrap and confirm alignment in the hoop before stitching.
How do heat transfer embroidery designs compare to tracing methods for accuracy and edge quality?
Heat transfer embroidery designs offer quick placement and repeatable alignment, especially on cotton and denim, but can create a slight raised layer if not handled properly. Graphite tracing provides a direct guide with less surface build-up but requires careful transferring and a stabilizer to prevent fabric distortion. The best approach depends on fabric, motif complexity, and the desired final finish.
What should I know about transfer paper for embroidery when planning a large motif?
Transfer paper for embroidery comes in inkjet, laser, and graphite variants to suit fabric and hoop settings. For large motifs, choose a paper with stable lines that erase or stitch over cleanly after embroidery, and pair with appropriate stabilizers to prevent shifting. Always test on scrap fabric and adjust pressure and heat settings according to the product.
Are iron-on embroidery transfers reliable for beginners, and how should I apply them to avoid distortion?
Iron-on embroidery transfers are beginner-friendly and fast, but require careful heat control. Use a protective cloth, pre-stabilize delicate fabrics, and ensure precise alignment before heat-setting. Peel the carrier sheet only after the design has cooled, and follow up with stabilizers for extra stability if needed.
How do stabilizers for embroidery transfers help prevent puckering during dense stitching?
Stabilizers for embroidery transfers provide the backbone to reduce fabric distortion under stitch weight. Choose tear-away for light fabrics, cut-away for dense stitches, or wash-away when finishing requires removal. Hoop the fabric taut, stitch with appropriate density, then remove stabilizer according to the type used.
When should you consider combining transfer methods for embroidery motif transfers to improve accuracy?
Combining transfer methods—such as graphite tracing for an initial outline with heat transfer placement or using a stabilizer-based follow-up—gives precise alignment and durable results. Start with a light placement, then reinforce edges with stabilizers as you stitch, ensuring fabric stability and repeatable results across projects.
| Topic | Key Points |
|---|---|
| Overview | – Goal: place the motif exactly where desired, keep it stable during stitching, and decide whether to remove or keep the guide after finishing. – Embroidery motif transfers span heat-based systems, paper-based transfers, and stabilizer-based methods. – The right method depends on fabric, motif complexity, project use, and care expectations. |
| Heat Transfer Method | – Design is printed or traced onto a transfer medium (sheet, film, or transfer paper) and applied with heat. – Works well on stable fabrics (cotton, linen, denim); offers speed and repeatability. – Pros: quick, precise placement; Cons: potential 3D texture if the transfer sits on the fabric; must match product with fabric and machine/hand stitching. |
| Iron-On Embroidery Transfers | – Transfers come as sheets or pre-printed designs, fixed via heat with an iron or hot press. – Beginner-friendly; good for complex motifs where tracing by hand is difficult; works best on lightweight fabrics and cotton blends. – Consider heat settings and stabilizers to prevent scorching or distortion; some systems include stabilizers for better alignment. |
| Transfer Papers and Graphite Methods | – Graphite or transfer paper is traced to leave visible guidelines on fabric. – Simple, low-cost, and controllable; lines can be faint and may require reinforcement with pens/chalk. – Pairs well with stabilizers (tear-away/cut-away) to reduce distortion. |
| Stabilizer-Focused Transfers | – Stabilizers (tear-away, cut-away, wash-away, water-soluble) hold fabric/stitch area steady. – Use beneath fabric or with the transfer to prevent shifting and puckering. – Water-soluble stabilizers are useful when you want to remove all stabilizer after stitching. |
| Transfer Paper Versatility & Fabric Compatibility | – Transfer papers vary (inkjet, laser, pen-based); select based on fabric, hoop, and machine settings. – Some papers suit dark fabrics (leaving visible chalk/graphite lines that disappear with washing); others leave marks to be covered by dense embroidery. – Choice depends on final look and whether a visible guide or hidden motif is desired. |
| Practical Steps (by method) | Heat Transfer Method: 1) Create/print motif on transfer medium. 2) Place face-down on fabric, align, and hoop if stitching later. 3) Apply heat at recommended temp/time with a protective cloth. 4) Cool and check adhesion before stitching. 5) Begin embroidery with fabric taut. Iron-On Transfers: Graphite/Transfer Paper: Stabilizer-Centric Approach: |
| Choosing the Right Method for Your Project | – Fabric type: delicate silks/knits favor gentler methods; denim benefits from heat transfer with stable stabilizers. – Motif complexity/size: large/complex motifs benefit from stabilizers and clear transfer guides. – End-use/care: frequent washing favors durable approaches that become part of the design. – Desired finish: subtle graphite + embroidery for a nearly invisible look; bold, crisp edges with heat transfer and stabilizers. |
| Common Mistakes & Troubleshooting | – Misalignment after transferring: ensure fabric is flat and taut; recheck after repositioning. – Puckering/distortion: use appropriate stabilizers and hoop tension; adjust stitch density. – Bleeding/discoloration from inks: test on scrap; use low-temp settings and protective coverings. – Residual stabilizer: rinse wash-away stabilizers thoroughly per instructions. |
| Upgrading Your Transfer Approach | – As projects scale, consider combining methods: graphite placement with stabilizer reinforcement, or heat transfer for overall placement plus precise embroidery. – Aim to maintain alignment, fabric stability, and workflow compatibility. |
| Expert Tips | – Pre-wash fabrics when possible to avoid post-embroidering shrinkage that shifts motifs. – Practice on scrap fabric, especially with heat transfer methods. – Test different stabilizer combinations to balance support and finish. – Document settings (heat, time, stabilizer type, transfer product) for repeat projects. – Maintain a toolkit of transfer options to quickly pick the right method. |
Summary
Conclusion