Sew and Apply Patches is a practical, creative way to breathe new life into worn denim and jackets while adding personal flair. From denim repair patches to the art of sewing patches on denim, you’ll learn how to patch jeans with durable stitching. Whether you use sew-on or iron-on patches, this guide covers placement, stitching, and practical tips to keep edges tidy. Using the right patches and backing, you can reinforce knees, elbows, pockets, or create a bold, personalized statement. By starting with a clean plan and steady hands, you’ll gain durable results that survive frequent wear and washing.
Beyond simple repairs, this craft is also known as fabric repair, patchwork embellishment, or garment customization, leveraging patches to extend wear. LSI-friendly terms like denim repair patches, patching techniques for jackets, and how to apply durable decorative appliqués help search engines connect related queries. The goal is to balance function and style, using sturdy backs, secure stitches, and thoughtful placement to protect fabric while adding personality. Whether you favor heat-activated iron-on backing or a hands-on sew method, you can tailor the approach to the garment and the wash routine. With practice, these approaches become part of everyday wardrobe repair rather than a one-off fix.
Sew and Apply Patches: A Pro Guide for Denim and Jackets
Sew and Apply Patches is both a practical repair technique and a way to personalize your wardrobe. This approach helps you extend the life of worn denim and tired jackets while adding character that reflects your style. When you commit to a patching plan, you gain reliable results that hold up to daily wear and frequent washing. The process works whether you’re patching jeans, a denim vest, or a favorite jacket, and it accommodates both sew-on patches and iron-on patches with adjustments to your method.
Start with a clear idea of placement, select patches that move with the fabric, and prepare your garment for stitching. For denim, thicker layers may require stabilizers; for jackets, test on an inconspicuous area to prevent discoloration. The secret to lasting patches is choosing the right stitching option and edge treatment, plus planning for durability through regular wear. In practice, this means paying attention to seam allowances, edge finish, and whether you’ll wash the garment frequently or hand-wash it to preserve the patch.
Sew-On vs Iron-On Patches: Choosing the Right Method for Everyday Wear
When you’re deciding between sew-on patches and iron-on patches, consider durability, fabric weight, and how often the item will be washed. Sew-on patches give a traditional, long-lasting finish, especially on denim and rugged jackets, where the stitching becomes part of the design. Iron-on patches are a quick fix that’s great for experimentation or decorative accents on lighter weight fabrics, but they can lift with frequent washes or heat exposure. The choice often comes down to how you use the garment and how much permanence you want.
To maximize longevity, plan to reinforce iron-on patches with a light stitching around the border or complement with sew-on edges. If you’re mastering sewing patches on denim, the combined approach often yields the best balance of speed and durability. For a durable outcome, your strategy should include how to patch jeans in practice, since even iron-on patches benefit from a final stitch to lock the edge and prevent edge fraying.
Placement Strategy: Where to Put Patches on Denim and Jackets
Placement matters for both look and function. On denim, knees, thighs, and pockets are common anchors for patches, while on jackets, patches tend to sit on the upper sleeves, chest, or back panel. A good rule is to place patches at least 1/2 inch away from seams to avoid bulk that complicates stitching. If you’re patching a worn knee, reinforcing with a second, smaller patch behind the front patch can add durability.
Before you commit, flatten the area with a quick press to prevent shifting as you work. For denim, you may want to use a backing stabilizer behind the patch or an interior interfacing to reduce bunching and help stitches bite through multiple layers. With jackets, test your patch in a hidden area first to ensure colorfastness and to confirm the placement aligns with the garment’s lines and details, especially when considering patches on jackets as a design feature.
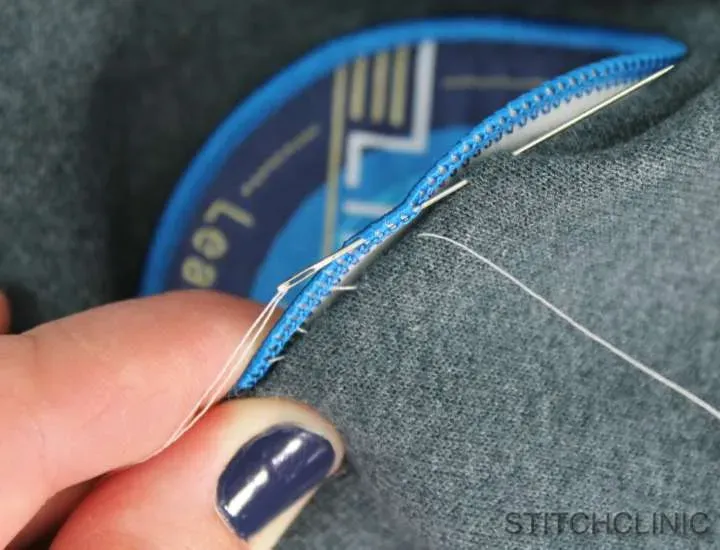
Stitching Techniques for Longevity: Edges That Stay Flat
Durable edges come from choosing reliable stitches: a zigzag around the patch edge, a decorative blanket stitch, or a tight straight stitch that just encircles the border. For curved shapes, a satin edge can yield a smooth, dense finish, while heavier patches benefit from fortifying stitches at the start and end to prevent pop-offs. The goal is a neat edge that remains flat through years of wear and washing.
Consistency matters when patching for durability. On denim repair patches, an even tension helps avoid puckering and keeps the patch aligned with the fabric grain. For jackets, alternating inner borders with a light outer outline can reduce bulk while maintaining a clean silhouette. A final topstitch around the perimeter often locks the patch in place and gives a professional finish that lasts.
How to Patch Jeans: Practical Methods and Denim Repair Patches
This section focuses on how to patch jeans, from knee repairs to high-wear elbows, using denim repair patches and compatible backing. Start by choosing a patch with a slightly flexible backing to move with denim, and prepare the area with cleaning and pressing. If you’re repairing a tear, consider layering patches for added strength and a rugged, authentic look that suits handmade styles.
Apply either sew-on or iron-on patches depending on your goal and fabric, and use backing stabilizer to improve edge security. After attachment, run a neat sewing line around the edge to ensure long-term durability in daily washing and wearing. When you patch jeans, the aim is a sturdy repair that remains visually appealing, retains flexibility, and handles repeated movement without lifting.
Care, Maintenance, and Longevity: Keeping Patches Looking Fresh
To maximize the life of patches, wash garments inside out on a gentle cycle and avoid high heat in the dryer. Regular inspection allows you to catch lifted edges early and re-stitch as needed. For denim, consider adding a second zigzag seam around high-wear areas to counteract abrasion and maintain the patch’s position over time.
For jackets and other heavier fabrics, air-drying is gentler on the patch and fabric alike, helping preserve color and adhesion. With proper care, denim repair patches and other patches can endure many washes while keeping functionality and style intact. This approach also supports the broader pattern of sewing patches on denim and patches on jackets, ensuring a balanced, durable finish.
Frequently Asked Questions
Sew and Apply Patches on denim: what is the most durable method for patches on denim?
On denim, sew-on patches generally last longer than iron-on patches. Use sew-on patches and secure with a zigzag or blanket stitch around the edge, and choose a strong thread (40 wt polyester or cotton) with a jeans needle. If the fabric is thick, add a backing stabilizer to reduce bulk. If you must use iron-on, reinforce the edges with light stitching after application for durability.
What’s the difference between iron-on vs sew-on patches for patches on jackets?
Iron-on patches attach quickly with heat but may lift after washing or heavy wear. Sew-on patches require stitching and typically offer longer-lasting durability on jackets. For best results, sew the edges around the patch; you can start with iron-on for placement and then add border stitches for extra security.
How to patch jeans using denim repair patches: step-by-step with sew-on patches?
Step 1: Clean and press the area. Step 2: Place the denim repair patch on the spot. Step 3: Pin or clip to hold. Step 4: Stitch around the edge with a zigzag or straight stitch, testing tension on a scrap. Step 5: Secure and trim threads. Step 6: Optional topstitch for a neat finish. If the patch area is thick, use a backing and a heavier thread for durability.
What tools and steps are best for sewing patches on denim?
Tools: patches, strong thread (40 wt), needle suitable for denim, scissors, pins or fabric clips, and optional interfacing/backing. Steps: position the patch, stabilize if needed, then stitch around the edge with a zigzag, blanket, or straight stitch. Test on scrap first and finish with secure knots and trim.
How to patch jeans with sew-on patches for durability and style?
Choose patch shapes and place them on high-wear areas (knees, pockets). Use sew-on patches for durability and secure the edges with a tight zigzag or blanket stitch. Consider multiple rows in very worn areas and finish with a light topstitch for a polished look. Wash inside out to extend life.
How to place patches on jackets for longevity when Sew and Apply Patches, and should I use iron-on or sew-on patches?
Place patches on jackets on upper sleeves, chest, or back panel, keeping at least 1/2 inch from seams to avoid bulk. Use backing on thicker fabrics to reduce puckering, and sew around the border for a durable finish. Iron-on patches work for quick placement, but reinforce with stitching along the edges for long-lasting wear.
| Aspect | Key Points | Notes / Best Practices |
|---|---|---|
| Patch Types | – Sew-on patches offer durability and a traditional sewing project. – Iron-on patches are quick and beginner-friendly but typically less durable on daily-wear pieces. | – For denim and jackets, sewing patches generally lasts longer. – If you use iron-on patches, reinforce edges with light stitching for longevity. – Choose patch type based on fabric weight and wear expectations. |
| Tools, Materials | – Patches (embroidered or sturdy fabric). – Thread (polyester or cotton, heavier for denim). – Needle (sharp/jeans needle) and scissors. – Pins/clips, interfacing (optional), iron & board (for iron-on). | – Match thread color to patch edge; use heavier thread for denim. – Have a small cutting backing to reduce bulk if patching thick fabrics. |
| Placement & Preparation | – Place patches at least 1/2 inch from seams. – Flatten area; consider backing stabilizer behind patches on thicker fabrics. – Test on hidden area for jackets. | – Plan alignment before attaching; press area to prevent shifting. – Use stabilizers to minimize bunching on multi-layer areas. |
| Sew-On Patches on Denim (Machine/Hand) | 1) Prepare area; place patch. 2) Secure with pins/clips; mark outline if desired. 3) Add stabilizer if fabric is thick. 4) Stitch options: zigzag, blanket, or dense straight stitch. 5) For hand-sewn, use backstitch; for machine, test first. 6) Secure threads and trim. 7) Optional topstitch for a finished edge. | – Use backstitch on denim for durability; ensure edges lie flat. – Test stitch settings on scrap before sewing the patch. |
| Patching Jackets by Hand (Sew-On or Patchwork) | 1) Choose method (hand gives tension control; combine inner border with outer edge). 2) Layer for stability on thick jackets. 3) Hand stitches: running stitch, backstitch, or satin stitch. 4) Secure and bury thread tails. 5) Check patch movement; ensure no puckering. | – Use a small backing for stability; test tension and edge finish before extensive use. |
| Iron-On Patches (Quick Attach) | – Follow manufacturer directions; apply heat with pressing cloth and allow to cool. – Iron-ons are convenient for temp or decor; may lift with frequent washing or heavy wear. – Reinforce edges with light stitching; consider final border stitching for durability. | – For best results, combine iron-on with stitching along the edges to extend life. – Test on a hidden area if unsure about fabric reaction. |
| Practical Tips for Success | – Match thread color to patch or use contrast for a bold outline. – Walking foot helps feed thick denim; test on scraps. – Test on scrap before committing. – Consider backing fabric behind patches on high-stress areas. – A touch of fabric glue along the edge can help prevent fraying before stitching. | – Always test first; keep edges tidy; reinforce edges in high-wear areas. |
| Care and Longevity | – Wash inside out on gentle cycle; avoid high heat. – For frequent denim washing, add extra stitching or zigzag seam. – Air-dry jackets to preserve fabric and patch. | – Gentle care extends patch life; consider additional reinforcement for heavily worn zones. |
| Common Pitfalls and How to Avoid Them | – Patches curling at edges; press well and use border stitches. – Uneven patches; use chalk guides and careful alignment. – Gaps along border; use smaller stitches or zigzag/satin edge. – Patch without backing; add stabilizer to reduce puckering. | – Plan placement carefully; press after stitching; back stabilizers help with bulk and edge neatness. |
Summary
Sew and Apply Patches offers a practical, creative approach to reviving denim and jackets, turning worn pieces into durable, personalized garments. By choosing between sew-on and iron-on patches, planning placement, and applying robust stitching, you can extend the life of jeans and jackets while adding a distinctive style. This guide covers essential topics such as patch types, tools, placement, step-by-step techniques for denim and jackets, care, and common pitfalls, all designed to help you sew like a pro and keep patches secure through daily wear.