Choosing between iron-on patches vs embroidered patches can feel like weighing everyday convenience against long-term permanence, especially when you’re updating a wardrobe or branding several items at once. For jackets, backpacks, or team uniforms, understanding how each option works—its adhesives, backing, and stitching requirements—helps you decide quickly and with confidence, minimizing surprises after purchase. This guide compares durability, cost, ease of use, and care between approaches, and it also touches on custom patches iron-on vs embroidery to illustrate how different methodologies meet distinct design needs. We will look at iron-on patches durability across fabrics, and discuss embroidered patches advantages, including color retention, edge finish, and resilience under repeated washing, while noting how backing types influence performance. Along the way, you will also get practical pointers on how to apply iron-on patches, common failure points to avoid, and what to expect from wear, care, and occasional topstitch reinforcement.
From another angle, practitioners often refer to adhesive-backed patches versus sew-on emblems as the core decision drivers, aligning with the same practical outcomes. These LSI-like terms expand the topic by including heat-activated designs, glue-backed badges, and traditional embroidery pieces, which broadens search visibility and helps readers connect related ideas. For branding teams, the choice often hinges on expected wear, laundering cycles, and the balance of speed, cost, and perceived quality, whether you call it a badge, patch, emblem, or appliqué. Understanding terms such as heat-activated patches, sew-on alternatives, fabric patches, and embroidery finishing helps map needs to production realities and customer expectations. By using LSI-like connections, you can craft content that answers questions across search intents—how to apply patches, durability expectations, and best practices for care.
Iron-On Patches vs Embroidered Patches: A Clear Side-by-Side Overview
Choosing between iron-on patches vs embroidered patches often comes down to convenience versus permanence. Iron-on patches use a heat-activated adhesive backing, allowing you to bond them to fabric with a heat source. Embroidered patches rely on thread stitching and backing, creating a dense, edge-to-edge design that is generally more resistant to wear. Understanding these fundamentals helps you map your project’s needs to the right patch type.
This overview sets the stage for considering factors like durability, cost, and ease of use. When evaluating, keep in mind that iron-on patches offer quick application and lower initial cost for simple designs, while embroidered patches deliver a premium finish and longer life under frequent washing. The choice becomes a balance between speed and long-term performance, rather than a single right answer for every scenario.
Durability Debate: How Each Patch Type Stands Up to Wash, Wear, and Time
Durability is often the deciding factor in patch selection. Embroidered patches advantages include strong color retention and a stitched edge that tends to endure repeated washing better than many iron-on designs. Polyester or rayon embroidery threads resist shrinking and fraying, helping the patch look newer longer on uniforms or gear subjected to regular laundering.
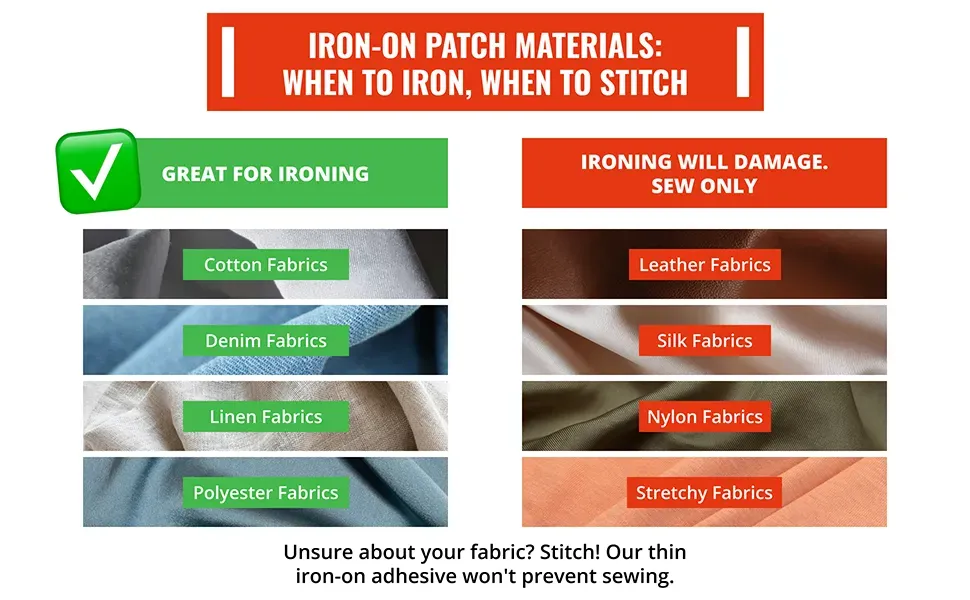
Iron-on patches durability depends on adhesive quality, heat-press technique, and fabric substrate. On stretch-prone or rough fabrics, edges may lift or curl after multiple washes if the backing isn’t robust. To maximize longevity, use proper heat settings, press time, and, for high-stress areas, consider a light interior stitch to supplement the adhesive.
Cost, Speed, and Customization: What Your Budget Gets You
Cost and speed are central to many projects. Iron-on patches generally cost less per unit for simple designs and can be produced quickly, making them appealing for schools, clubs, or time-sensitive campaigns. In contrast, embroidered patches require more setup and stitching labor, which drives up the price but delivers a premium, durable finish that many brands value.
In terms of customization, iron-on patches excel at rapid prototyping since colors and sizes can be adjusted without retooling. Embroidered patches shine when the goal is brand perception and long-term wear, especially for multi-color logos or gradients where embroidery can achieve richer detail. If gradients or subtle shading matter, embroidery often delivers a more polished result.
Best Use Cases by Application: When to Pick Iron-On vs Embroidered Patches
Iron-on patches are ideal for quick updates to casual wear, bags, or event merchandise. They’re great for temporary branding or limited-time campaigns where speed and cost matter, and for DIY projects where you want an easy, at-home attachment.
Embroidered patches are preferred for team uniforms, corporate branding, and high-end apparel. They excel in durability through harsh washing, support multi-color logos with gradients, and provide a professional, premium appearance that stands up to years of use.
How to Apply Iron-On Patches Correctly: A Practical Guide
If you decide iron-on patches are right for your project, knowing how to apply iron-on patches correctly is essential to maximize durability. Begin with a preheated fabric surface, then place the patch exactly where you want it. Use a light marker or tape to hold it in place before applying heat.
Cover the patch with a thin cloth or parchment paper to protect the fabric, and press with a hot iron at the recommended temperature (typically around 160–180°C / 325–350°F) for 15–30 seconds per area. Avoid gliding the iron; instead, press in place and allow the patch to cool completely to ensure the adhesive sets. For added security, topstitch around the edge of high-stress patches.
Design Considerations and Care: Preserving Patch Aesthetics Over Time
Design considerations influence patch performance as much as material choice. Fabric compatibility matters—some knits or delicate synthetics don’t hold iron-on patches as reliably, which can favor embroidered options for a lasting finish. Patch backing types also affect how you attach and whether you can reuse the patch later.
Care and maintenance extend patch life regardless of method. For iron-on patches, avoid high heat during washing and drying and consider turning garments inside out. For embroidered patches, wash with similar colors and steer clear of harsh chemicals that can fade thread colors. Regular inspection and, if needed, light topstitching around edges can help preserve both the look and durability over time.
Frequently Asked Questions
Iron-on patches vs embroidered patches: what’s the difference and when should I pick each?
Iron-on patches vs embroidered patches differ mainly in attachment method and longevity. Iron-on patches use a heat-activated adhesive for quick, low-cost application suitable for temporary updates on casual wear, bags, or event merchandise. Embroidered patches use stitched edges and backing to create a durable, premium finish that holds up to frequent washing and heavy wear.
What are the embroidered patches advantages compared to iron-on patches in terms of durability and finish?
Embroidered patches advantages include a strong, long-lasting finish, color retention, and a premium look that survives frequent washing. They offer a professional, durable appearance—ideal for team uniforms and corporate branding—though they come with a higher upfront cost and longer production time.
Iron-on patches durability vs embroidered patches: how do they hold up in washes and wear?
Iron-on patches durability depends on the backing quality, heat-press technique, and fabric. They can lift or peel in high-stress areas or after many wash cycles, especially on stretch fabrics. Embroidered patches generally provide better long-term durability due to thread stitching and color stability, though aggressive washing can still affect edges.
How to apply iron-on patches vs embroidered patches: quick guidelines for best results?
For iron-on patches, preheat the fabric, position the patch, cover with a protective layer, and press with a hot iron at the recommended temperature for 15–30 seconds, then cool completely. Embroidered patches are typically sewn on for maximum durability, but you can choose an iron-on backing if you prefer a no-sew option, followed by additional stitching for high-stress areas.
Custom patches iron-on vs embroidery: how do cost and customization differ?
When comparing custom patches iron-on vs embroidery, iron-on patches generally offer faster turnaround and lower upfront costs, making them good for prototyping and budgets. Embroidered patches cost more due to setup and stitching, but deliver a premium branding experience and greater durability for uniforms and corporate programs.
Which option is best for professional branding and high-wear uniforms: iron-on patches vs embroidered patches?
For professional branding and high-wear uniforms, embroidered patches are typically the better choice due to durability, a premium appearance, and strong color retention after repeated washes. Iron-on patches can serve as quick, temporary branding or decorative accents but may not endure long in demanding environments.
| Topic | Iron-On Patches | Embroidered Patches |
|---|---|---|
| What they are | • Fabric patches with heat-activated adhesive backing. When heat is applied (iron or heat press), the adhesive bonds to fabric, creating a semi-permanent hold that’s quick and easy.
• Iron-on patches are designed for fast, convenient application. |
• Embroidered patches are created by stitching thread directly onto a fabric backing or onto a separate backing that’s later sewn or fused.
• Result is a dense edge-to-edge design with threads that endure frequent wear. |
| Pros | • Speed, ease of application, and lower initial cost for simple designs. • Ideal for temporary decorations, quick updates on uniforms, bags, or apparel. |
• Strong durability, long-lasting color, and a premium look that holds up under frequent washing and heavy use. • Tight weave and clean finish; preferred for brands and teams. |
| Cons | • Reduced durability on high-wear fabrics; possible lifting after repeated washing; heat sensitivity of some fabrics. | • Higher upfront cost; longer production times; need for sewing or an additional backing to attach to fabrics. |
| Durability & Longevity | • Longevity depends on adhesive quality, heat-pressing technique, and fabric. Edges may lift if heat/pressure aren’t optimal. • A well-applied patch maintains appearance after many wash cycles, though aggressive cycles can cause edge lifting. |
• Embroidery relies on thread and stitched edges, offering better resistance to wear and shrinking. Polyester or rayon threads provide strong color retention; edges stay intact with proper care. |
| Cost & Customization | • Generally lower cost per unit for simple designs and quick production. • Great for schools, clubs, or tight timelines; easy color/size changes for prototyping. |
• Higher setup and stitching labor costs; premium appearance and durability can justify the price for branding, uniforms, or fashion lines. • Stronger option for complex color gradients and detailed artwork. |
| Best Use Cases | • Quick updates to casual wear, bags, or event merchandise. • Temporary branding or limited-time campaigns. • Simple logos or single-color designs with fast turnaround. • DIY projects and at-home customization. |
• Team uniforms, corporate branding, and high-end apparel. • Designs requiring durability through heavy washing or harsh conditions. • Multi-color logos with gradients and subtle shading. • A professional, premium look that stands up to years of use. |
| How to Apply & Attachment | • Preheat fabric. • Position patch. • Cover with thin cloth or parchment. • Apply heat with pressure at recommended temperature (≈160–180°C / 325–350°F) for 15–30 seconds per area. • Let patch cool fully; optional topstitching for extra security. |
• Typically sewn-on or fused backing. • Some patches come with iron-on backing; for permanent attachment, sew-on or use a backing designed for sewing. |
| Care & Maintenance | • Avoid high heat during washing/drying; turn garments inside out; use gentler cycles. • If edges lift, consider topstitching around the perimeter for extra security. |
• Wash with similar colors; avoid harsh chemicals that can fade thread colors. • Periodic brushing can remove lint and keep colors vibrant. |
| Design Considerations | • Fabric compatibility: high-stretch knits or delicate synthetics may not hold iron-ons well. • Some fabrics benefit from embroidery for reliability on stretchable materials. |
• Patch backing types: iron-on backing requires compatible heat-activated adhesive; embroidery can come with iron-on backings but sew-on is often preferred for long-term use. |