Embroidered Patches Design is more than decoration; it’s a way to tell a story, brand a project, or celebrate a hobby. Together with embroidery patches design tips, you can balance motif clarity with texture, stitches, and finishing touches. This guide shows how to design embroidered patches that look professional and wear well, turning simple motifs into wearable art. Backings, stitch density, color, and substrate all influence patch embroidery ideas for durable results on jackets, bags, or uniforms. Whether you are creating DIY embroidered patches for a small business, a team uniform, or a personal jacket, the aim is creative embroidered patches that resonate with your audience.
From a broader textile perspective, patch work can be framed as textile embellishment, insignia creation, or badge artwork—each term signaling a similar idea. This broader view uses related concepts like embroidery motifs, patch elements, and fabric appliqué to describe how to bring figures and symbols to life. Considering manufacturing realities such as backing types, thread choices, and stitch types helps translate artistic ideas into workable patch designs. By thinking in terms of wearable art and brand storytelling, you connect design that reads well on different garments to strategies used in DIY patches, small-batch production, and consumer markets. In short, this LS-informed approach links visual concepts to production steps, guiding you from concept sketches to stitched, durable patches ready for sale or personal use.
Embroidered Patches Design: Defining Purpose and Audience
When you begin with Embroidered Patches Design, the first step is to define what the patch represents and who it’s for. Clarifying the purpose guides every design decision, from shape and size to stitch density and backing. If you’re learning how to design embroidered patches, start with a clear brief: is the patch celebrating a hobby, signaling membership, or promoting a brand? A well-defined audience helps you choose motifs, contrasts, and finishing touches that resonate at a distance and reward close inspection.
This planning mindset also ties into embroidery patches design tips and the broader strategy of scalable production. By anchoring your concept to a specific user or community, you align every element—from color palette to backing options—with real-world needs and preferences. The result is a patch that communicates its message succinctly, looks professional, and wears well across garments and accessories.
Shape, Size, and Substrate: Foundations for Patch Embroidery Ideas
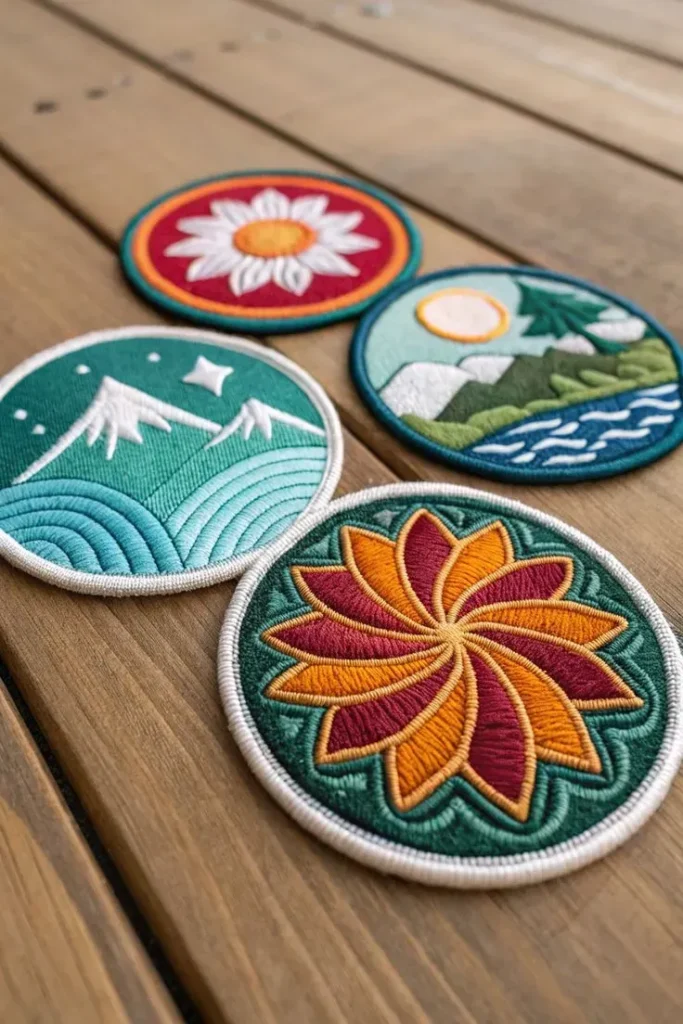
The patch’s shape and size are foundational decisions that influence legibility and impact. Classic forms like circles, squares, and shields work reliably for logos and emblems, while custom shapes can elevate a concept into wearable art. Patch embroidery ideas often spring from optimizing silhouette for the intended fabric and use case, ensuring the motif remains readable at typical viewing distances.
Backing and substrate are equally important. The fabric you plan to sew or iron onto affects stitch density and edge behavior, with dense twill, denim, canvas, and heavy cotton providing stable bases. Knit fabrics may require adjustments to prevent stretching and distortion. Thinking through substrate compatibility at the outset reduces surprises during digitizing and stitching.
Motif Planning and Storytelling for Memorable Patches
Successful embroidered patches begin with a compelling concept and a clear narrative. Start with a rough sketch and ask: what emotion or story should the patch convey? Who will wear it, and in what contexts will it be seen? This storytelling angle helps you craft a composition that feels balanced and purposeful, whether you’re pursuing creative embroidered patches for personal projects or a broader product line.
Incorporate storytelling considerations into your planning to improve readability and memorability. A patch intended for a streetwear line might emphasize bold outlines and high-contrast color, while a school club patch may prioritize legibility and cohesive color relationships. By aligning motif, color, and scale with audience expectations, you create a patch that audiences can identify with instantly.
Digitizing for Precision: From Art to Stitch-Ready Files
Digitizing translates your concept into machine-ready instructions, guiding where stitches go and in what order. For Embroidered Patches Design, selecting stitch types that match the motif is essential. Satin stitches deliver clean edges for outlines, while fill stitches model larger areas with color. Running stitches add fine texture details but require careful tension control to avoid fabric perforation.
When preparing stitch data, pay attention to stitch density and underlay. Underlay stabilizes fabric and helps prevent distortion around curves, which is especially important for intricate designs or smaller patches. If you’re new to digitizing, start with simpler shapes and gradually tackle more complex characters or logos. You can digitize by hand after drawing your motif, or begin with vector art to guide stitch placement and ensure clean results.
Color Theory and Thread Selection in Embroidered Patches Design
Color is central to the impact of any patch. Start with a limited palette to maintain clarity at small scales, typically 3–5 thread colors for most designs. Consider color harmony and contrast against the garment to ensure legibility from a distance. Metallic threads can elevate a patch’s premium feel but require compatible stabilizers and careful tension management to avoid sheen issues or puckering.
Testing color options on fabric swatches or simulated materials helps confirm how threads read in real conditions. For DIY embroidered patches, you can experiment with software simulations or printed fabric samples to compare combinations before stitching. A well-chosen palette keeps the design cohesive, expressive, and versatile across different fabrics and light conditions.
Stitch Techniques, Durability, and Backing Options
Durability hinges on choosing the right stitches and balance between density and flexibility. Satin stitches deliver crisp edges for lettering and outlines, while fill stitches cover larger areas with texture that can mimic shading. Avoid over-dense stitching on patches intended for frequent washing, as stiffness can crack or distort the shape.
Backings influence how a patch is applied and how it wears over time. Iron-on backings are convenient for quick projects but may degrade after washing or on heat-sensitive fabrics. Sew-on backings offer durability but require manual stitching. Hybrid options provide security with a combination of adhesive and sewn edges. Designing with backing in mind helps you propose practical options for customers and expands the ways patches can be used.
Production, Quality, and Market Readiness for DIY Embroidered Patches
If you plan to scale patches for sale or multiple units, consider production workflow from the outset. Vectorize artwork for clean lines, standardize stitch counts across designs, and use consistent thread brands to reduce variability. Implement quality control checks that verify thread integrity, color consistency, and backing adhesion after simulated washes.
Packaging and presentation matter as much as the patch itself. A well-finished patch signals craft and value, supporting a professional Embroidered Patches Design and inviting customers to appreciate the work. For makers exploring the market, study successful patches within your niche to identify conventional expectations and opportunities for innovation. Maintaining evergreen designs alongside seasonal variants can support a sustainable catalog and long-term growth in the realm of embroidery artistry.
Inspiration, Case Studies, and Practical Tips for Creative Embroidered Patches
Real-world examples illuminate what makes Embroidered Patches Design sing. Look for patches that balance legibility with detail, such as animal motifs with bold outlines or emblems that combine text with simple iconography. Analyze edge-definition, color contrast, and how stitching interacts with fabric texture to refine your own approach.
Practical tips include testing on fabric swatches, maintaining consistent thread tension, and keeping designs within your machine’s practical stitching envelope. Engaging with maker communities, sharing progress, and soliciting feedback strengthens design choices and the craft overall. For those pursuing DIY embroidered patches, iteration is your ally—the more you stitch and revise, the more you learn about what works in practice, not just in theory.
Frequently Asked Questions
What are essential embroidery patches design tips for getting started with Embroidered Patches Design?
Start with a clear purpose and plan the patch shape and size to fit the garment. Use a simple motif and a limited color palette (3–5 colors) to maintain legibility, and choose a durable backing and fabric that support stitching. Employ satin stitches for clean edges, consider stitch density and underlay to prevent distortion, and test your design at smaller scales (50% or 25%) before production.
How to design embroidered patches effectively within a cohesive Embroidered Patches Design workflow?
Begin with a rough sketch and define the patch’s purpose, then decide on shape, size, and backing. Move to digitizing, selecting satin stitches for outlines and fill stitches for color areas, and monitor stitch density and underlay. Test the design at reduced scales to catch issues early, and ensure the file translates cleanly to the machine.
What patch embroidery ideas work well for Embroidered Patches Design?
Consider ideas like bold, outlined animals, emblems that combine text with simple icons, or mascots that convey personality. Keep designs legible at small sizes with high-contrast colors against the garment, and verify edge-definition and how stitching interacts with fabric texture.
What makes creative embroidered patches stand out in Embroidered Patches Design?
Creative patches excel in edge-definition, color contrast, and texture. Use a cohesive color palette, strong outlines, and a thoughtful mix of satin, fill, and micro detailing to read well from a distance and up close. Ensure the shape and backing support a professional finish that wears comfortably.
Can DIY embroidered patches be scaled from prototype to production within a single Embroidered Patches Design workflow?
Yes. Start with a prototype, then vectorize artwork for clean lines and standardize stitch counts across designs. Use consistent thread brands, perform washing simulations, and conduct quality checks for thread breaks and backing adhesion. Maintain evergreen designs alongside seasonal variants to support a stable catalog.
Which backing and color strategies align with embroidery patches design tips for DIY embroidered patches within the Embroidered Patches Design framework?
Choose backing based on durability and application: iron-on for quick projects, sew-on for long wear, or a hybrid for added security. Leave a small margin around the edge to accommodate expansion and use stabilizers (tear-away or cut-away) to prevent distortion. Build a 3–5 color palette, test color swatches on fabric, and verify contrast in real lighting to ensure legibility.
| Aspect | Key Points |
|---|---|
| Introduction: why Embroidered Patches Design matters |
|
| Foundations: shape, size, and substrate |
|
| Planning and concept: motif selection, storytelling, and audience |
|
| Digitizing and stitch selection: translating art into stitch-ready files |
|
| Color theory and thread selection: building a compelling palette |
|
| Stitch techniques and durability: ensuring longevity |
|
| Backing options and application methods: iron-on, sew-on, and hybrid approaches |
|
| Production considerations: scale, packaging, and quality control |
|
| Inspiration, case studies, and practical tips |
|
Summary
Embroidered Patches Design shows how a simple motif becomes a durable, wearable story that can grow from a single prototype to a brand extension. By clarifying purpose, choosing the right shape and size, digitizing with appropriate stitches, selecting a cohesive color palette, and choosing a reliable backing, you can create patches that are not only visually striking but also durable and marketable. Whether you are pursuing DIY embroidered patches for personal projects or building a brand with a line of patches, the core ideas remain consistent: clarity of concept, meticulous stitching, and care in presentation. Keep experimenting, study real-world examples, and refine your process. With practice, your Embroidered Patches Design will travel beyond one-off pieces to become recognizable signatures of your craft.