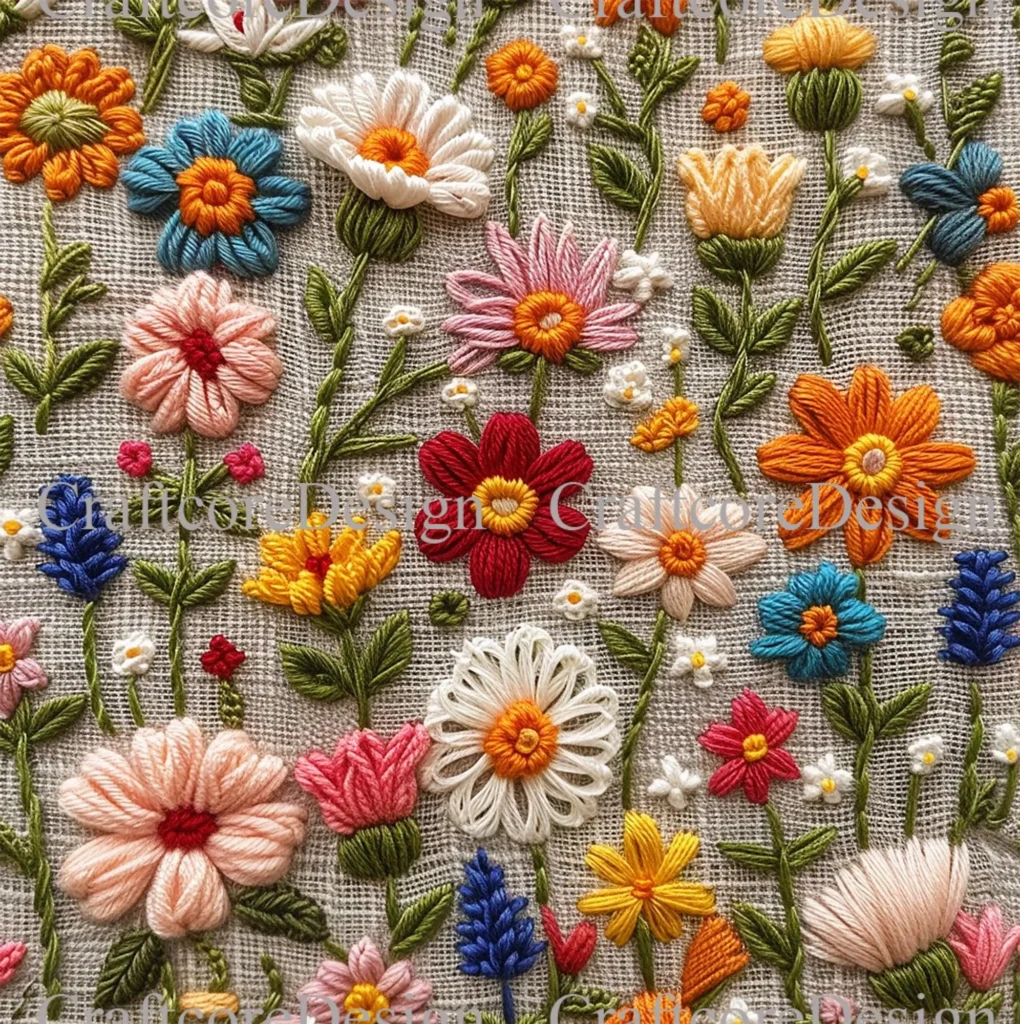
An embroidered design on fabric adds texture, color, and personality to clothing, home textiles, and keepsakes. From delicate hand stitches to precise machine work, this art blends creativity with technique to transform plain textiles. Whether you lean toward hand embroidery for fabric or explore machine embroidery on fabric, you’ll benefit from a clear step-by-step embroidery guide. This brief introduction highlights design planning, transfer methods, and stitch choices you can apply to projects of any size. With patience and practice, you’ll turn ordinary textiles into enduring keepsakes you’re proud to display or wear.
In other terms, a stitched design on textiles creates decorative threadwork that ranges from simple motifs to elaborate panels. You can explore fabric embroidery techniques through both hand embroidery for fabric and machine embroidery on fabric, selecting stitches that suit your project. A practical step-by-step embroidery guide helps beginners translate ideas into finished pieces, while experienced stitchers experiment with texture, shading, and color. Using Latent Semantic Indexing concepts, synonyms like needlework on textiles, decorative stitching, and threadwork on fabric broaden the topic and improve search reach. No matter whether you’re decorating garments, household textiles, or wall hangings, these terms connect you with tutorials, tips, and inspiration for your embroidery journey.
Embroidered design on fabric: A Comprehensive Start-to-Finish Guide
Embroidery elevates plain textiles by turning them into personalized art, and a clear plan helps you translate that vision into a polished embroidered design on fabric. Start by outlining the project, choosing a suitable item, and mapping the size and placement of your motif. This aligns with a step-by-step embroidery guide mindset, ensuring you move from concept to execution with confidence. By thinking through fabric type, thread selection, and transfer methods early, you set up for clean lines and durable stitching.
Whether you lean toward hand embroidery for fabric or want to explore machine embroidery on fabric, the project benefits from a structured workflow. Consider how the design will wear—garments, home décor, or wall art—and tailor your approach accordingly. This sub-tasking keeps the embroidered design on fabric coherent from initial sketch to final finish, while offering room to experiment with color, texture, and layering.
Choosing Fabric and Stabilizers for Optimal Fabric Embroidery Techniques
The foundation of successful fabric embroidery techniques is selecting the right fabric and stabilizers. Natural fibers like cotton, linen, and canvas handle most stitches well, while blends can add texture. For delicate fabrics, lightweight stabilizers prevent puckering; for heavier textiles, sturdier stabilizers preserve stitch integrity. Pairing fabric weight with the appropriate stabilizer is a cornerstone of quality embroidery on fabric.
Hooping it correctly and choosing the right stabilizer—tear-away, cut-away, or wash-away—significantly affects final results. In addition, consider the tension and hooping method to maintain smooth, even stitches. This stage ties directly into both hand embroidery for fabric and machine embroidery on fabric, ensuring the fabric remains taut enough for precise transfer and consistent stitch formation.
Mastering Hand Embroidery for Fabric: Essential Stitches and Textures
Hand embroidery for fabric shines when you master a core toolkit of stitches: backstitch for crisp outlines, satin stitch for filled shapes, and texture stitches like stem and chain for curves and detail. French knots add dimensional dots that mimic seeds or flower centers, bringing life to your motifs. By combining these stitches thoughtfully, you create expressive surfaces without relying solely on machine work.
A practical approach is to work from the center outward, maintaining balanced thread tails and controlled tension. Choosing threads—cotton floss, stranded cotton, or rayon—impacts finish, glitter, and durability. Practice on scrap fabric to calibrate tension and stitch length before committing to your final piece, ensuring the embroidered design on fabric looks cohesive and deliberate.
Exploring Machine Embroidery on Fabric: Setup, Designs, and Finishing
Machine embroidery on fabric offers speed and repeatability, especially for designs that require consistency across items. Start with a properly hooped stabilizer, the correct needle type, and compatible thread. Computerized designs simplify the workflow, but many projects benefit from using built-in stitches for spontaneous effects. This approach pairs well with the broader fabric embroidery techniques you’ve been developing.
As you gain experience, you can add decorative stitches, monograms, or color changes to expand your repertoire. Properly matching fabric weight to the needle and stabilizer helps prevent puckering and distortion, while testing a small sample of the design first can save time and material. Machine embroidery on fabric is a powerful method to achieve precise, repeatable results that complement hand stitching.
Step-by-Step Embroidery Guide: From Transfer to Finishing Touches
A well-structured approach keeps projects moving smoothly from concept to completion. Start with sizing and planning: determine final dimensions and map the design onto the fabric. Prepare the fabric, secure it in a hoop or frame, and choose a transfer method that leaves minimal marks. This is the backbone of any step-by-step embroidery guide, ensuring clean edges and accurate placement.
Proceed with outlining using backstitch or split stitch, then fill areas with satin stitch or long-and-short stitches. Build texture with stem stitch, French knots, and chain stitch, layering colors gradually for depth. Finish by removing the hoop, trimming threads, and washing away stabilizers as needed. Proper care—gentle washing, ironing from the back—extends the life of your embroidered design on fabric.
Troubleshooting Common Embroidery Issues on Fabric
Puckering and uneven stitches are common early hurdles. Ensure you’re using the right stabilizer for your fabric and maintaining balanced tension in the hoop. If puckering appears, consider a lighter stabilizer or re-hooping to reduce distortion. Checking needle size and thread weight to match fabric helps prevent these issues from arising.
Fraying edges and thread tails can undermine a finished look. Secure tails with small knots, bury them at the back, and guide threads neatly along the fabric weave. Practicing stitches on scraps before committing to a final piece, and keeping a tidy back with consistent stitch length, minimizes fraying and loose ends, preserving the crisp edges of your embroidery on fabric.
Frequently Asked Questions
What is an embroidered design on fabric and why is it popular?
An embroidered design on fabric is a decorative motif created by stitching thread onto textile, using hand embroidery for fabric or machine embroidery on fabric. It adds texture, color, and a personal touch to items such as napkins, garments, or wall hangings, and the results are durable with proper care.
Which fabric embroidery techniques are best for beginners when working on embroidery on fabric?
For beginners, start with simple stitches like backstitch, satin stitch, and running stitch on natural fabrics. These fabric embroidery techniques build confidence and teach correct stitch size and tension before attempting more complex motifs.
Can you provide a step-by-step embroidery guide for creating an embroidered design on fabric?
Yes. A step-by-step embroidery guide starts with selecting a design, transferring it onto the fabric, securing the piece in a hoop, and then stitching with basic stitches. Finish with tidy ends, gentle washing of stabilizers if used, and pressing from the back.
What are the differences between machine embroidery on fabric and hand embroidery for fabric for most projects?
Machine embroidery on fabric offers speed, precision, and repeatability, ideal for multiple items or detailed fills, while hand embroidery for fabric provides tactile texture and control for unique detailing. Choose based on fabric weight, stabilizers, and the desired finish.
What essential materials do I need to begin an embroidered design on fabric?
Gather suitable fabric, stabilizer, hoop or frame, needles, and threads (cotton floss, rayon, or metallic). A basic starter kit covers most fabric embroidery techniques and helps achieve a clean embroidered design on fabric.
What common mistakes should I avoid when creating an embroidered design on fabric, and how can I fix puckering or uneven stitches?
Common issues include fabric puckering from improper stabilizer or tension, and uneven stitches from using the wrong needle or thread weight. Avoid these by selecting appropriate stabilizers, matching needle and thread to the fabric, and practicing on scrap fabric before working on your project.
| Topic | Key Points |
|---|---|
| Materials & Setup | – Fabric: natural fibers (cotton, linen, canvas); blends offer texture. Choose lightweight stabilizers for delicate fabrics and sturdier ones for heavier fabrics. – Stabilizers: tear-away (woven fabrics), cut-away (dense or stretch fabrics), wash-away (delicate threads). Use a hoop/frame to keep fabric taut for clean stitches. – Threads: DMC cotton floss, stranded cotton, rayon, metallics. Variegated threads add painterly effects. Synthetic threads for durability and colorfastness. Practice with multiple types. |
| Design selection & transfer | – Choose design size and character suitable for your fabric. Start simple for scale and balance. – Transfer methods: water-soluble pen, tracing paper + tailor’s chalk, carbon transfer sheets. Lightly mark to leave minimal visible marks. – Plan the layout to emphasize focal areas and keep background stitches simple for visual balance. |
| Hand embroidery techniques | – Core stitches: backstitch (outlines), satin stitch (filled areas), stem stitch, chain stitch (texture). – Details: French knots for centers or seeds. – Tips: work from center outward, leave long tails, manage tension to avoid puckering or loose stitches. |
| Machine embroidery on fabric | – Hooped stabilizer, proper needle and thread. – Computerized designs or built-in stitches for spontaneity. – Needle choice: sharp for woven fabrics; adjust stabilizers to prevent puckering. – Start simple with outlines and fills; progress to decorative stitches and color work. |
| Step-by-step workflow | – Plan and size the design; map onto fabric. – Prepare fabric: iron, trim loose threads, secure in hoop/frame; use stabilizer if lightweight. – Transfer design; outline first (backstitch/split stitch). – Fill shapes with appropriate stitches; work with weave direction. – Add texture/details; layer colors gradually. – Finish: remove hoop, trim threads, wash away stabilizers, press from back with cloth barrier. – Care: gentle washing; avoid high heat. |
| Common mistakes & how to avoid | – Puckering: use stabilizer and balanced tension; adjust as needed. – Uneven stitches: match needle size and thread weight; test on scrap fabric. – Fraying: secure tails, bury ends, and guide edges smoothly. |
| Project ideas | – Monogrammed napkins/towels with simple hand embroidery. – Denim jacket patch using fabrication techniques for durability. – Botanical wall hanging blending hand and machine embroidery for precision. |
| Finishing & care | – Trim loose ends; secure tails on the backside. – Test washability for metallic/specialty threads. – Store pieces flat or rolled to prevent creasing; wash with mild detergents; avoid high heat to protect stitches. |
Summary
Conclusion: Embroidered design on fabric blends creativity with technique. Whether you lean toward traditional hand embroidery for fabric or embrace the efficiency of machine embroidery on fabric, the core ideas remain the same: plan your design, stabilize your fabric, select appropriate threads, and stitch with patience. With the right materials and a methodical workflow, you’ll produce embroidery that looks as good on day one as it does after repeated wears and washes. Practice with small motifs, build up your stitch vocabulary, and gradually tackle more complex patterns. The joy of seeing a design come to life stitch by stitch is the essence of the embroidered design on fabric—and your growing skills will only enhance every project you choose. If you’d like, I can tailor this post to a specific project (garment, home décor, or quilting) or provide downloadable handouts with a stitch-by-stitch checklist for your next embroidered design on fabric.