Troubleshooting Embroidered Design Mistakes is a vital skill for both hobbyists and professionals seeking to elevate their work, because a well-understood process saves time, materials, and frustration while producing consistently reliable results. By understanding common embroidery mistakes and the practical fixes for embroidery mistakes, you can diagnose issues quickly, document what goes wrong, and keep projects on track from the initial concept to the finished piece, building confidence with every sample you test. This introductory guide covers how to assess stabilizers, hooping, threads, needle choices, and fabric interactions to prevent misalignments, puckering, and uneven tension before a single stitch lands, ensuring fabric behaves as expected during long runs. We’ll show you a straightforward troubleshooting embroidery workflow that helps you spot trouble points, test replacements on similar fabrics, adjust settings, and maintain a clean working environment so derailment becomes a rare event. With clear tips and checklists, you’ll learn embroidery design tips that translate to cleaner stitches, stronger coverage, and more consistent results across a range of materials and project types, and this mindset supports iterative testing, professional results, and growing confidence when you bring embroideries to clients.
Viewed from a broader lens, addressing stitching issues means preparing thoughtfully, stabilizing the fabric, and choosing the right tools to prevent errors before they surface. Think of it as a systems approach that links backing materials, hoop stability, thread tension, and digitizing choices to reduce distortions and ensure precise alignment. Framing problems as opportunities to refine your setup helps you translate setbacks into better results, longer-lasting stitches, and cleaner symmetry across construction. Practically, this means selecting appropriate stabilizer, calibrating density and stitch types, and testing on similar fabrics to validate performance before a full run. In short, mastering fault prevention in machine embroidery comes down to consistent habits, careful observation, and a willingness to adjust processes as you experiment with new fabrics, designs, and machines.
Troubleshooting Embroidered Design Mistakes: A Practical Framework for Diagnosis
Troubleshooting Embroidered Design Mistakes is a fundamental skill for anyone working with thread and fabric. Whether you stitch as a hobby or design for clients, diagnosing why a design misbehaves helps you predict issues before they happen and apply targeted fixes quickly. This approach aligns with broader embroidery design tips and the idea of reducing common embroidery mistakes through proactive planning.
A systematic troubleshooting methodology starts with the basics. Check fabric and stabilizer, verify hooping, inspect needle and thread, review the machine and design file, analyze stitches, and run a test stitch. Each step narrows the likely cause and guides you toward the most effective fix, turning problems into learning opportunities about embroidered design mistakes.
Common Embroidered Design Mistakes and How to Fix Them
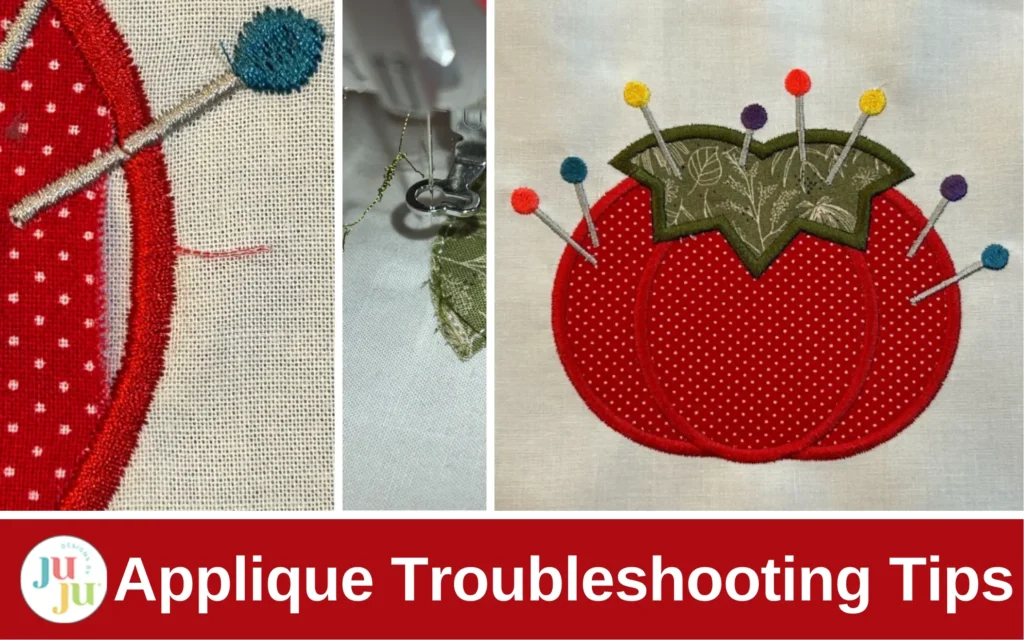
Common Embroidered Design Mistakes include puckering on lightweight fabrics, frequent thread breaks, and loose or missing stitches. You’ll also encounter misalignment, needle imprints, and issues at color stops. Recognizing these patterns is the first step to implementing practical fixes for embroidery mistakes.
As you diagnose, keep in mind the suite of fixes for embroidery mistakes: stabilize properly, match needle and thread, rethread the bobbin, adjust top and bottom tension, and rework the design density. Implementing these steps consistently reduces the impact of embroidered design mistakes and improves overall results.
Stabilizer, Hooping, and Fabric: Foundational Embroidery Design Tips to Prevent Distortion
Stabilizer choice and hooping technique lay the foundation for clean results. The right stabilizer for the fabric weight, combined with taut but not stretched hooping, minimizes distortion and keeps your embroidery design tips on track. This foundation has a direct effect on how the design behaves and helps prevent common embroidery mistakes.
Beyond choosing stabilizers, align your project with fabric type and stitch density. For knits, lighter stabilizers and careful underlay can prevent puckering; for woven fabrics, cut-away stabilizers provide lasting support. These considerations reflect essential embroidery design tips that reduce the chances of mistakes during stitching.
Tension, Threads, and Needles: Tweaks for Reducing Thread Breaks and Puckering
Tension, thread quality, and needle size are frequent culprits behind thread breaks and puckering. Poor tension or a dull needle can amplify issues even when the design and stabilizer are correct. This is a core area of troubleshooting embroidery as you learn to identify root causes and adjust the setup accordingly, addressing common embroidery mistakes at the source.
To fix these problems, swap to the correct needle for the thread weight, slow down the machine when approaching dense areas, and verify top and bobbin thread balance. Running a test stitch on scrap fabric is a reliable way to confirm the adjustments before continuing the main project.
Color Changes and Underlay: Managing Stops for Cleaner Embroidery
Color changes introduce potential weak points at color stops. Planning color changes in the design and using tools like color stop indicators or pre-wound bobbins helps produce clean transitions. Managing color changes is a practical embroidery design tip that directly reduces visible joins and other fabric tension issues.
Underlay plays a key role in coverage and stability, especially around high-contrast color changes. Using appropriate underlay, consolidating stitching layers, and choosing stabilizers that counteract fabric stretch all contribute to smoother color transitions and fewer design flaws.
Digitizing and Design Planning: Proactive Steps from Idea to Finished Stitch
Digitizing and design planning are often the unseen drivers of successful embroidery. Clear node placement, realistic stitch angles, and appropriate underlay are essential aspects of embroidery design tips that prevent embroidered design mistakes before the needle touches fabric.
Before committing to production, test on similar material with the same stabilizer and hoop. Small test stitches reveal density or sequence issues that would otherwise become fixes for embroidery mistakes after the fact. This proactive testing stops problems early and accelerates quality wins across projects.
Frequently Asked Questions
What are the most common embroidered design mistakes, and how can I troubleshoot embroidery issues effectively?
Common embroidered design mistakes include puckering, thread breaks, loose or missing stitches, needle imprints, misalignment, and color-stop issues. A practical troubleshooting approach is to start with the basics: verify the fabric and stabilizer, re-hoop if needed, confirm the correct needle and thread, and check the embroidery machine and design file. Then inspect stitches at a problem point, adjust tension or density, and run a test stitch on scrap fabric before proceeding. This methodic workflow helps diagnose causes quickly and improves overall stitch quality.
What embroidery design tips help prevent common embroidery mistakes during troubleshooting?
Key embroidery design tips to prevent issues include choosing the right stabilizer for the fabric weight, using proper underlay, and setting appropriate stitch density. Align the design with the fabric grain, select suitable stitch types for textures, and digitize with clean node placement and realistic angles. Always test on similar material and stabilize the area well before final stitching. These practices reduce distortion and make troubleshooting more efficient when issues arise.
What fixes for embroidery mistakes should I apply when thread breaks or stitches are missing?
When thread breaks or stitches are missing, start by re-threading both the bobbin and needle and confirming top-bottom thread balance. Replace worn needles, check for burrs on the needle eye, and use the correct needle size for the thread weight. Slow down the machine and avoid forcing stitches through tight areas. If the problem persists, review the design sequence and re-save the file to rule out potential corruption.
How do stabilizer choices and hooping technique influence embroidered design mistakes and troubleshooting outcomes?
Stabilizer selection and hooping are fundamental to preventing problems. Use the stabilizer type and weight that suits the fabric to minimize puckering and distortion, and choose tear-away or cut-away appropriately. Hoop the fabric taut but not stretched, clean the hoop, and re-hoop if there’s any slack. A secure hoop and proper stabilizer dramatically reduce misregistration and other embroidery mistakes during troubleshooting.
How can I recognize misalignment or needle imprints, and what steps fix these common embroidery mistakes?
Signs of misalignment include shifted designs and visible drift, while needle imprints indicate insufficient stabilization or too-dense stitching. Fixes include re-hooping with careful alignment using center marks, upgrading stabilizer to prevent hoop slippage, and adjusting density or sequence to reduce stitching in problem areas. Slowing down the machine and verifying the design’s alignment marks before stitching also helps prevent these issues.
What quick troubleshooting checklist helps catch embroidery design mistakes before you stitch?
Use this quick checklist: confirm the right stabilizer for the fabric, hoop fabric taut with no slack, select the correct needle and thread, ensure the design is appropriate for fabric weight and fiber content, test the design on similar material, plan and test color changes, and verify machine/software readiness. Running a small test stitch on scrap material can reveal potential embroidery design mistakes before the main project. This proactive approach saves time and materials while improving outcomes.
| Topic | Key Points |
|---|---|
| Introduction | Troubleshooting Embroidered Design Mistakes is a skill that helps embroidery enthusiasts and professionals diagnose and fix issues, improving stitch quality, design accuracy, and consistency across projects. The goal is to minimize problems by proper workflow—selecting stabilizers, hooping correctly, choosing compatible threads and needles; considering design factors like stitch density, underlay, and sequence; and applying practical strategies to prevent mistakes before they occur. |
| Common Embroidered Design Mistakes | Puckering and fabric distortion; Thread breaks and shredding; Loose or missing stitches; Needle imprints and visible punch-through; Misalignment and shifts; Color changes and thread fraying at color stops; Stabilizer issues. |
| Troubleshooting Methodology | 1) Check fabric and stabilizer. 2) Inspect hooping setup. 3) Review needle and thread. 4) Examine machine/software. 5) Analyze stitches. 6) Perform a test stitch. |
| Fixes for Embroidery Mistakes | – Reduce puckering: increase stabilizer, lower stitch density, proper underlay. – Address thread breaks: correct needle size, quality thread, check needle eye; slow down. – Fix loose/missing stitches: re-thread bobbin/needle; balance threads; verify stitch sequence; re-save design. – Minimize needle marks: stabilize fabric; lighter top thread; larger needle eye. – Correct misalignment: re-hoop; stabilizer that prevents hoop slippage; align center marks. – Improve color changes: plan color changes; use pre-wound bobbins or color stops; adjust tension/needles. – Stabilizer selection: switch to tear-away or heavier cut-away; use multi-layer stabilizers. |
| Design Tips to Reduce Mistakes | – Keep designs printer-ready: appropriate stitch count/density; avoid excessive satin in small areas. – Use appropriate stitch types; layer underlay. – Plan for fabric stretch and grain; align placement; counteract stretch with stabilizers. – Test on similar materials. – Digitizing considerations: node placement, stitch angles, underlay. – Maintenance routine: clean embroidery area, check thread paths, inspect tension discs. |
| Tools and Materials for Better Embroidery | – Stabilizers: Tear-away, cut-away, water-soluble. – Fabrics: choose fabrics suited to embroidery. – Needles: ball-point for knits, sharp for woven, appropriate size. – Threads: high-quality embroidery thread. – Hoop sizes/frames: fit project and hold fabric flat. – Digitizing software and design libraries. |
| Quick Troubleshooting Checklist | – Right stabilizer for fabric? – Fabric hooped without slack? – Correct needle and thread? – Design appropriate for fabric weight/fiber? – Tested on similar material? – Color changes planned and executed correctly? |
Summary
HTML table with key points about Troubleshooting Embroidered Design Mistakes and a concluding descriptive paragraph.