Custom patch design process starts with a clear concept and practical constraints that shape the final badge. This is a systematic journey that turns a simple idea into a durable, wearable emblem for a brand, team, or cause. Whether you’re producing a small run or a large merchandise line of custom embroidery patches, understanding the design process helps save time, reduce costs, and ensure high quality. In this guide, we outline the major stages from sketch to stitch, focusing on practical steps and decisions that keep production on track. Along the way, you’ll encounter guidance on materials, threads, and finishing touches that affect patch production process.
From a different angle, the journey resembles a badge creation workflow that blends art with engineering, collaboration, and realistic timelines. Instead of a single drawing, you walk through a design-to-production continuum that converts sketches into stitch data, color schemes, and finished patches. This LSI-friendly framing ties together concepts like patch design steps, embroidery patches design, digital vectorization, and material selection, so teams communicate clearly across departments and build a shared language for reviews. By thinking in terms of embroidery patches design, fabric compatibility, backing options, and care guidelines, the process stays adaptable for different garments and wear conditions. Whether you’re planning a boutique run or a broad licensing program, the goal remains the same: reliable, repeatable results you can trust across your production workflow.
Understanding the Scope of Custom Embroidery Patches: Function, Durability, and Brand Identity
Beyond aesthetics, custom embroidery patches must perform on fabric, withstand regular wear and washing, and preserve faithful color representation across materials and lighting. This makes the patch design steps more than a visual exercise; it’s about translating a brand message into a durable emblem that can survive real-world use. By integrating functionality early in the concept phase, you reduce rework later in the patch production process while ensuring your patches communicate clearly at a glance.
From the outset, collaboration between designers, digitizers, and production technicians helps align artistry with manufacturing realities. Treating patches as products with design, technical, and sourcing considerations ensures consistency across runs. When you prioritize both aesthetics and durability, your embroidery patches design approach yields results that look right in print and right on fabric, whether for a small run or a large merchandise line.
Sketch to Stitch: Turning Concepts into Wearable Patches
The first step centers on concepting and sketching, where inspiration meets feasibility. Designers capture the core idea with silhouette-focused sketches, then refine them into tighter concepts that guide the rest of the process. Asking early questions about the patch’s purpose, placement on jackets or hats, and legibility at final sizes helps ensure the final patch communicates the intended message without sacrificing production practicality.
A strong concept yields clear lines, readable silhouettes, and balanced embroidery density. Multiple thumbnail sketches exploring layouts, borders, and density help prevent over-crowding that can blur details when scaled down. This stage—concept to concise composition—begins bridging art and engineering in the patch design steps.
Custom patch design process: Vectorization, Shape, and Edge Treatments
After selecting a concept, the patch design moves into vectorization, which creates scalable, precise outlines that guide the embroidery digitizing phase. This step establishes the shape, inner details, and color blocks that will translate into stitches. A clean vector file also reduces surprises during production by ensuring that logo lockups and typography remain legible across sizes.
Deciding on the patch shape and edge treatment is essential for the final look and durability. Edge options like merrow borders, satin stitching, or laser-cut outlines influence how the patch reads from a distance and how it wears over time. Clear vectorization supports consistent digitizing, helping to preserve identity as you progress from sketch to stitch in the embroidery patches design workflow.
Digitizing for Embroidery: Turning Vector Art into Stitch Data
Digitizing is the heart of the embroidery patch journey. A skilled digitizer converts vector artwork into stitch data, selecting stitch types (satins, fills, running stitches), determining densities, underlay, and pull compensation to keep stitches stable on fabric. The goal is crisp edges, smooth curves, and faithful color representation while accounting for fabric behavior and thread characteristics.
During digitizing, test stitches verify how the design sews out on real fabrics. Simplifying fine details, adjusting line weights, or reconfiguring color transitions may be necessary to optimize thread count and stitch balance. Predefining a color palette with Pantone references or trusted thread brands helps ensure repeatable results across production runs, reinforcing the embroidery patches design and overall brand fidelity.
Color, Materials, and Backing: Foundations for Durable Patches
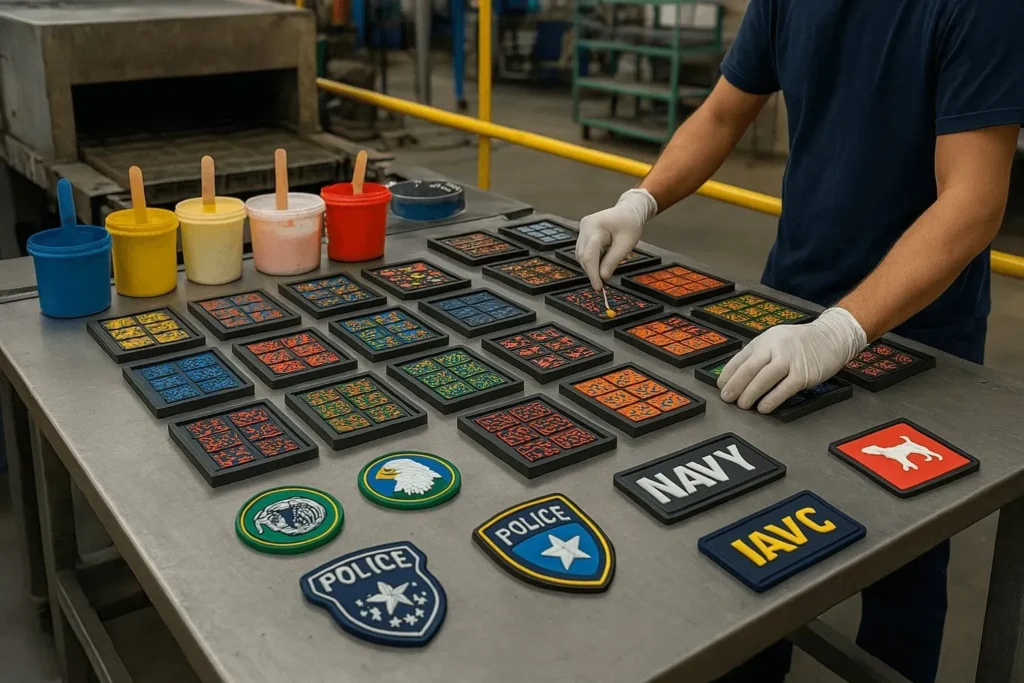
Material choices—such as twill or felt—and backing options (iron-on, sew-on, or heat-applied) directly affect appearance, wear resistance, and cost. Selecting appropriate fabrics and backings is a core step in aligning practical application with design intent. Dry-fit and wash tests on representative garment types help verify how materials perform in real-world use, guiding final decisions before production.
Border treatments and patch size are also pivotal. Merrowed edges create a clean, durable finish, while laser-cut borders offer a flatter, modern silhouette. The chosen materials, backing, and border treatment should fit the intended application, care instructions, and production feasibility, ensuring that the final embroidery patches design remains legible and true to the original concept when fabricated.
Prototyping, Quality Control, and Production Planning in the Patch Production Process
Prototyping is the most reliable way to evaluate how the patch performs in real-world wear. Sampling allows you assess edge sharpness, color accuracy, stitch density, and overall balance on different fabrics and backings. Iterative adjustments to the design, stitch plan, or color palette help optimize the result before committing to a full run, saving time and money in the patch production process.
Production planning and quality control ensure consistency across batches. Clear communication about size, shape, backing, and packaging reduces miscommunication during manufacture. A robust QC plan—inspecting stitches, color consistency, edge finishing, and backing attachment—helps guarantee that the first batch matches the approved prototype, supporting reliable outcomes for substantial orders and reinforcing the value of meticulous project management in the patch production process.
Frequently Asked Questions
What is the custom patch design process and what are its main stages?
The custom patch design process covers the full journey from concept to production, including concept and sketching, design development and vectorization, embroidery digitizing, color and thread planning, material/backing/size decisions, prototyping, and production planning with quality control. It reflects the patch design steps needed to turn an idea into durable, wearable embroidery patches that reflect a brand or team.
How does the sketch to stitch approach influence embroidery patches design?
Sketch to stitch describes moving from rough concepts to precise vector artwork and then to stitched embroidery. This path helps preserve the silhouette, layout, and legibility, guiding decisions at each stage of the embroidery patches design and ensuring the final patch reads well on fabric.
What factors should be considered when choosing materials, backing, and patch size?
Material choices (fabric type), backing options (iron-on, sew-on, or heat-applied), patch size, and border treatments all influence durability, cost, and readability. Align these choices with the patch production process and intended application to produce patches that look great and wear well.
How are colors and threads selected to maintain brand fidelity in embroidery patches design?
Color decisions balance aesthetics with production realities. Designers and technicians use Pantone references or reliable thread brands, considering thread shine, wash fastness, and compatibility with the backing. Testing color pairs at the intended patch size helps safeguard brand fidelity in the embroidery patches design.
What role does prototyping play in the patch production process?
Prototyping is a critical checkpoint that evaluates edge sharpness, color accuracy, stitch density, and overall balance on real fabrics. It allows you to refine the design, adjust the stitch plan, or tweak the color palette before committing to full-scale production within the patch production process.
How is quality control implemented to ensure consistency across production runs?
A robust quality control plan covers stitch quality, color consistency, edge finishing, and backing attachment. Using first-batch checks against the approved prototype, along with color swatches and stitch density targets, helps ensure patches remain consistent across runs in the patch production process.
| Stage | Focus | Key Activities / Deliverables | Notes |
|---|---|---|---|
| Step 1: Concept and sketching | Feasibility and messaging | Rough sketches; identify purpose, usage, and appropriate scale; multiple thumbnails | Ensure legibility; keep production in mind; avoid overcrowding |
| Step 2: Design development and vectorization | Translate to vector for scalability and embroidery accuracy | Outline shapes, inner details, and color blocks; decide patch shape and edge treatments (merrow borders, satin stitching, laser-cut outlines) | Vector file aids digitizing; preserves identity across sizes; reduces surprises in production |
| Step 3: Digitizing for embroidery | Convert vector artwork into stitch data; optimize for fabric and thread | Select stitch types (satins, fills, running stitches); stitch densities; underlay; pull compensation; test stitches | Predefine color palette with Pantone references; adjust for thread behavior |
| Step 4: Color and thread selection | Balance color fidelity with production realities | Pantone matching; choose thread weights and embroidery styles; consider metallics or specialty finishes | Test color pairs on finished patch size and backing; verify readability |
| Step 5: Materials, backing, and patch size | Choose fabrics, backing, and size for durability and usability | Select fabric (twill, felt) and backing (iron-on, sew-on, or heat-applied); decide border type (merrow, satin, laser-cut); determine patch size | Wash/dry tests; ensure backing and border align with application |
| Step 6: Prototyping and sampling | Real-world evaluation of patch | Produce physical samples; test edge sharpness, color accuracy, stitch density; assess readability and comfort; refine design as needed | Testing across fabrics/backings helps finalize production plan |
| Step 7: Production planning and quality control | Plan production and enforce QC | Plan lead times, MOQs, material sourcing, equipment readiness; develop QC checklist covering stitches, color, edges, backing | First-batch comparison against prototype; aim for consistency across runs |
| Step 8: Practical tips and common pitfalls | Guidance to avoid typical mistakes | Maintain clean vector files; provide color references early; build buffer for sampling; anticipate pitfalls | Common issues include over-detail, wash durability, color fastness, and stitch over-density; plan for testing |
Summary
Custom patch design process is a structured journey from concept to production that turns ideas into durable, wearable emblems. This descriptive overview highlights eight major stages—from concept and sketching through vectorization, digitizing, color planning, materials and backing choices, prototyping, and production quality control—showing how thoughtful planning and rigorous checks deliver patches that faithfully reflect a brand and endure daily wear. By treating patches as products with design, technical, and manufacturing considerations, you can optimize outcomes, control costs, and ensure consistent quality across batches for sports teams, corporate programs, or creative communities.